How to Create an Accent Wall in Your Home
December 30, 2020
From your family room where you connect with loved ones to your master bedroom where you relax and unwind, your home is the setting for all of life’s best moments. It is where you continue old traditions, create new ones, and find comfort in every corner. Most of all, it is the place that feels entirely like you.
With a new home as your “open canvas,” you are free to create any atmosphere you like! One of the most rewarding ways to do this is to create an accent wall in one of the rooms of your home — a wall that truly sticks out from everything else around it and reflects your personal style.
With the holidays around the corner, there is nothing more fun than taking on a creative DIY project in your home. Take a look at a few different DIY home accent wall ideas:

How to Make a Black Shiplap Accent Wall in Your Bedroom
Bold and sleek, with hints of luxury, black is the perfect color to transform any bathroom into an eye-catching space. While you have most likely seen shiplap (wooden board) used on the exterior of homes, it adds a pop of modern style to any interior.
Step 1: Remove molding and original paneling
The first step when installing floor-to-ceiling shiplap (wooden board) is to remove as much as in the bathroom possible. This can include wall molding, baseboards, the toilet, and the sink.
Step 2: Install from the top down
It is best to install shiplap from the top down, since you will likely have an uneven piece of shiplap, and it will be harder for the eye to see any imperfections at the bottom.
Step 3: Miter edges for a finished look
While mitering (joining) the edges may take some time, it is certainly worth it in the end!
Step 4: Finishing touches
Once the shiplap is installed, you can fill in gaps with caulk, then sand and paint the shiplap. (You can also decide whether you want to paint the door and trim in black as well.) Make sure to completely conceal the original wood by using two precise coats of paint (or more if needed)!

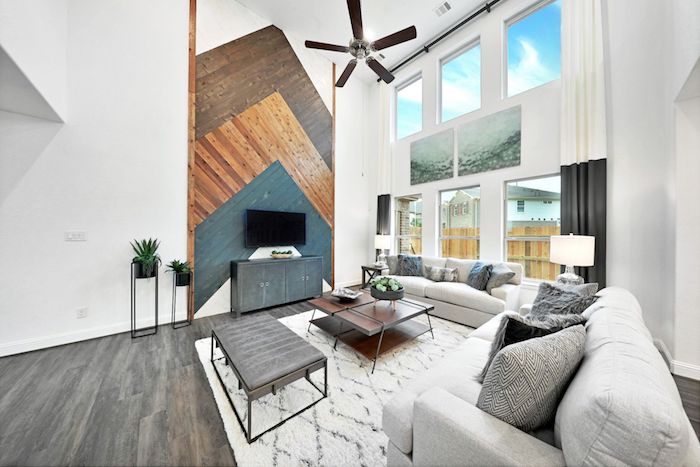
How to Build a Timber Wall
Like shiplap, wood wall paneling creates a clean and appealing aesthetic in any room. If you are looking to spruce up a flexible space like a loft, timberwall is the perfect addition!
Supplies: Timberwall Landscape Arctic Wood Wall Plank Kit
Tools: Laser level, pencil, miter box with hand saw or jigsaw, measuring tape, flat trim
Step 1: Measure
Measure the wall area you would like to apply the wood planks and figure out how much surface area you need to cover. Add in 10% of additional material for edge waste.
Step 2: Store the wood
Once you have purchased the wood, store it inside for 72 hours at a temperature between 65-85 degrees Fahrenheit to allow it to acclimate before installation.
Step 3: Strip the wall
Make sure to strip off any wall coverings, nails, or extra paint on the wall you are working with. Wipe the wall to clear off any dust (the surface should be clean, dry, and free of any debris before installing).
Step 4: Lay out the pattern
Lay out the pattern on the floor so you can be sure the offset will work to
your liking.
Step 5: Remove the baseboard
Remove the baseboard and start the material at the floor line. Start at the bottom in one of the corners.
Step 6: Place the wall
Once you have your first piece ready, peel off the backing and place the adhesive side to the wall, holding it for 10 seconds to adhere to the wall. The adhesive will adhere completely in 24 hours.
Step 7: Cut edges
Work your way across each row and then up, cutting the edges as needed to fit.
Step 8: Clean finish
Use your flat trim end strips to adhere to the wall at the edges for a clean finish. Cut the trim to fit, then paint it with Sherwin William 7006 Extra White, and nail it to the wall with trim nails.

Dimensional Line Wood Wall
The wall behind your bed in your master bedroom draws the eye and sets the tone for the rest of the room. Looking for a modern change? Dimensional lines create a vibrant aesthetic (that is also classy and clean)!
Supplies: Latex wall Paint (try Sherwin Williams 7006 Extra White), clear wood finish, 1×2 paint grade clear flat trim, finish nails, putty (to match wood stain)
Tools: Tape measure, pencil, 4-ft and 2-ft levels, miter saw, paint brushes, hammer/nail gun, nail set, 220-grit sandpaper, 320-grit sandpaper, tack cloth
Preliminary: Use 220-grit sandpaper and sand all surfaces of 1×2 wood trim. Use 320-grit sandpaper and sand all visible surfaces and edges of wood trim. Use a sanding block, sand with grain, and be careful not to round off edges. Remove all sanding dust and wipe down with the tack cloth. Follow clear wood finish manufacturer’s instructions and pre-coat all visible surfaces and edges of 1×2 wood trim. Let dry for 24 hours.
Step 1: Prepare area for work
Lay plastic or fabric drop cloth on the floor. Tape or tack as required to keep covering in place to protect adjacent surfaces. Follow the latex wall paint manufacturer’s instructions and paint wall.
Step 2: Mark outline of feature on wall
Note where dimensions are to faces or centerlines of wood trim. Make sure to work slowly — measure 3 times, and draw lines once. Use 4-ft and 2-ft levels to be sure that lines are perfectly level, plumb, or angled, as required.
Step 3: Install wood trim
Use miter saw and cut wood trim to length. Again, work slowly, and measure 3 times and cut once. Apply clear finish to cut ends of trim. Let dry for 24 hours. Install wood trim with finish nails. Use level to ensure trim is perfectly level or plumb. Set nail heads 1/16” below the surface of the wall trim and fill with putty to match wood color.
Step 4: Final coat
Follow clear finish manufacturer’s instructions and apply the final coat to wood trim features. Let dry for 24 hours. Touch up wall paint where required to cover pencil marks or blemishes.
There is nothing like taking on your own home project, especially around the holidays. Once you are finished, you can stand back and admire your masterpiece… for years to come! We have a bunch of unique DIY wall ideas for your home, so take a look and get inspired to make a stylish addition to your favorite room!
Connect With Us
- Categories
- Buying (1)
- City (25)
- Communities (16)
- Design (16)
- Featured Story (7)
- Home (35)
- News (41)
Recent Posts
Why Aledo ISD Makes Country Hollow the Perfect Place to Call Home
The Psychology of Color: Choosing the Right Palette for Your Home
Why a Master-Planned Community Could Be the Perfect Place for Your Next Home
Archives